Wednesday, September 16, 2009

preserving patch state

Ever wondered how to preserve a patching status

Overview : Be it junior apps DBA or an Experienced Apps DBA architect, you would encounter this situation atleast once in your life time as an Apps DBA.

Whether you are on an point release upgrade or normal apps patching assume a patch has failed. Patch is about 30 mb and you are half through, you found that its a known issue and applying new pre-req/fix patch would resolve the issue.

Two things can be done here

1) Abort the current patch failing/skipping the workers using adctrl.
2) Apply the new patch which would fix the issue
3) Reapply the main patch which had issue

Patching would be successful but will take up additional time reapplying the main patch. Suitable for DEV/TEST instance but not for Production where downtime is critical.

Lets see the next senario where we can reduce the patching time .

1) Abort the current patch failing/skipping the workers using adctrl.
2) Save the patch/worker state of the current patch to do this follow the steps below

a)Backup the FND_INSTALL_PROCESSES & AD_DEFERRED_JOBS table which is owned by the APPLSYS schema

rename fnd_Install_processes to fnd_Install_processes_bkp;
rename AD_DEFERRED_JOBS_bkp to AD_DEFERRED_JOBS;

b) Backup the .rf9 files located in $APPL_TOP/admin//restart directory.
At this point, the adpatch session should have ended .

c) Backup restart directory

cd $APPL_TOP/admin/
mv restart restart_bkp
mkdir restart

d) Drop the FND_INSTALL_PROCESSES table and the AD_DEFERRED_JOBS table ( we already backed up these).

drop table FND_INSTALL_PROCESSES;
drop table AD_DEFERRED_JOBS;

2)Apply the new patch.

3) Restore the backedup info for main patch i.e FND_INSTALL_PROCESSES,AD_DEFERRED_JOBS, restart directory,.rf9

cd $APPL_TOP/admin/
mv restart restart_old
mv restart_bkp restart


rename fnd_Install_processes_bkp to FND_INSTALL_PROCESSES;
rename AD_DEFERRED_JOBS_bkp to AD_DEFERRED_JOBS

4) Start adpatch, it will resume where it stopped

Note: This will resume the patch and not restart the patch :)

Happy patching

Monday, June 18, 2007

Interview Questions

How to find out the version of Applications Installed ?

This information is available in FND_PRODUCT_INSTALLATIONS , which will be in apps schema.

connecting as apps user you could execute the following sql statement.

SQL> select release_name from fnd_product_installations;

if you have connected as any other user you could use

SQL> select release_name from apps.fnd_product_installations;

PS Make sure you have select previlage on apps.fnd_product_installations table.

How do we check the version of Form server installed or the Forms Server patch level ?

You could use f60gen commandline to check the version of the forms installed.


example : f60gen help=yes

the above gives you form server version as well as the parameters that you can supply.

f60gen is an executable to generate/re-generate form files/menu/libraries.

if f60gen display 6.0.8.10 is Forms patch set 1 and if its 6.0.8.23 then its patch set 14.

How to findout the version of Jinitiator installed ?

Jinitiator version will be available in either application context file $CONTEXT_FILE and forms configuration file appsweb_${CONTEXT_NAME}.cfg.

use the following

grep jinit $CONTEXT_FILE or grep jinit appsweb_${CONTEXT_NAME}.cfg

please note that the actual jinitiator will be picked up from appsweb_${CONTEXT_NAME}.cfg which is available in $FND_TOP/RESOURCE and $OA_HTML/bin


How to determine the version of JDK installed ?

Java -version will give you the version of JDK installed .

How do identify the Applications files version ?

Applications file versions can be determined using either strings command or ident/adident command on unix flavours.

The ident command is available for most flavors of UNIX; exceptions are
SUN and AIX. For SUN and AIX, the adident command is used.

The syntax for both ident and adident is as follows:
[ident|adident] [pattern] [file1 |, file2, file3, . . .]

applications files could be form/menu/libraries/packages(pkg)/sql etc.

All you would be intrested is the Header information of each of these files

for example : adident Header test.fmb

How to find if an Apps patch has been installed or not ?

AD_BUGS table consists of all the bug fixes i.e patches that are applied on to the Oracle Applications system. AD_BUGS is ownder by Apps user , you need to connect to Apps user or should have a select previlage on that table .

for ex select bug_number from ad_bugs where bug_number='123456';

you could find other details of the patch installed , please check ad_bugs table.

Background :
Often it becomes cumbersome to check pre-requistes while doing pre patch analysis for a patch. If the pre-req list is huge, comparing the pre-reqs and the installed patches becomes difficult. following is a simple procedure and function made easy to check the pre-reqs.

Prerequisite :
Create the following function and procedure once per instance as an Apps user or any user who has access to ad_bugs table.

create or replace function check_bug(bug_num varchar2)
return number is
result varchar2(100);
begin
select count(bug_number) into result from ad_bugs where bug_number=bug_num;
return result;
end;
/

create or replace procedure check_patch_list( patches in varchar2 ) as
patch_list varchar2(2000):=patches;
patch varchar2(2000);
idxval number;
type patch_info is record ( patch_no number,status number) ;
type patch_record is table of patch_info index by binary_integer;
patch_records patch_record;
record_num number:=0;
begin
loop
idxval:= instr( patch_list, ',' );
if idxval = 0 then
patch:= patch_list;
else
patch:= substr( patch_list, 1, idxval - 1 );
patch_list:= substr( patch_list, idxval + 1 );
end if;
record_num:=record_num+1;
patch_records(record_num).patch_no:=patch;
patch_records(record_num).status:=check_bug(patch);
exit when idxval = 0;
end loop;
Dbms_output.put_line('------------------- ');
Dbms_output.put_line(' patches Installed ');
Dbms_output.put_line('------------------- ');
for i in 1..record_num
loop
if patch_records(i).status=1 then
dbms_output.put_line(patch_records(i).patch_no);
end if;
end loop;
Dbms_output.put_line('------------------- ');
Dbms_output.put_line(' patches Not Installed ');
Dbms_output.put_line('------------------- ');
for i in 1..record_num
loop
if patch_records(i).status=0 then
dbms_output.put_line(patch_records(i).patch_no);
end if;
end loop;
end;
/

Usage :
exec check_patch_list( );

SQL>cl scr
SQL>set serverout on
SQL>set feedback off
SQL> exec check_patch_list('5720000,3167649,3582074,2032040,2385942,3562652,3313183,10000');
-------------------
patches Installed
-------------------
5720000
3167649
3582074
2032040
2385942
3562652
3313183
-------------------
patches Not Installed
-------------------
10000

Note: The argument for check_patch_list procedure is a single string.


How do create identity.obj file ?
You can use adjkey -initialize .

What is a context file ?
context file in Oracle Applications is a centralized repository of all Oracle Applications configurations.

How to create/re-create a context file ?
We can use either adbldxml.sh or adbldxml.pl utility, its located on $AD_TOP/bin directory.

How do I determine if AutoConfig is enabled?

Check for the script adcfginfo.sh (adcfginfo.cmd on windows) under $AD_TOP/bin. If it exists use it to check whether AutoConfig is enabled
For the APPL_TOP:
Adcfginfo.sh contextfile=
For products
Adcfginfo.sh contextfile=>contextfilepath> show=enabled
If adcfginfo.sh doesn't exist, look in any configuration file in our APPL_TOP. If the file header contains the following, AutoConfig has been run on your instance:

################################################################
# AutoConfig automatically generates this file. It will be read and overwritten. If # you were instructed to edit this file, or if you are not able to use the settings # created by AutoConfig,refer to Metalink document 165195.1 for assistance.
################################################################

Note: If we manually changed any file containing file header, it is no longer considered as officially AutoConfig enabled!

How to edit a context file ?
Context file in Oracle Application is an xml file. This can be edited using a normal text editor such as vi,ed etc. Direct access is preferred when you are sure about xml tags. There are two other ways of editing a context file one is using utility called editcontext and the other one is using OAM.

Editcontext is a java application provided by oracle for updating the values in the context file. It is provided as a patch (patch: 2873456). Editcontext provides a list of all the updatable context variable values along with their titles. The title is not the variable name or value of oa_var attribute, but it is derived from adctxinf.xml which comes with the editcontext patch and stores the title along with the oa_var value for each context variable. Editcontext only lists those context variables, which are listed in its repository (adxmlctx.tmp). If you find that, not all variables are listed, then the version of this file is probably lower than the adxmlctx.tmp stored in $AD_TOP/admin/template. In that case just copy this file from $AD_TOP/admn/template to the editcontext repository (i.e. /editcontext/etc).

After launching editcontext, we have to find the context variable that we want to update. Once we find it, we can just change the value and save the new value to the context file (To be precise editcontext rewrites the whole context file instead of just updating one value). Since the list of context variables is quite long, it may take a while to find the desired context variable in the list.

PS editcontext uses X-emulation software to run, and it is quite cumbersome to
use because the parameters are not listed in any logical sequence.

How do we configure Oracle Applications ?
You can use use adconfig.sh and adautocfg.sh.

use the following syntax
$ ./$AD_TOP/bin/adconfig.sh \
contextfile=$APPLTOP/admin/$CONTEXT_NAME.xml \
appspass=password

$ adautocfg.sh

the only difference you find is you dont need to supply the context file in case of adautocfg.sh.

PS: adautocfg.sh is available from 11.5.10

How do we register off-cycle products with Oracle Applications ?

AD Splicer incorporates an off-cycle product into Oracle Applications so that it is recognized by the AD Utilities as valid Oracle Applications products. AD Splicer registers the product and creates a new environment setup. Then you use AutoPatch to install the product’s component file system and database objects. AD Splicer must be run for each APPL_TOP and database combination.

Note: AD Splicer cannot be used to add custom, non-Oracle products to your APPL_TOP.
Sunday, June 10, 2007

Installing Oracle Applications

Applications 11.5.10 installation

This includes:

1. Pre Installation Steps
2. Main Installation Steps
3. Post Installation Steps(optional for 11.5.10 Installation)

1. Pre Installation Steps:
1.1 Creating two user accounts and set ownership rights.
 Create a group
Log in as root and execute the command
# groupadd dba

 Create two users (applmgr and oracle)
Create applmgr user and assigning to dba group
# useradd -g dba -d /apps/applmgr applmgr
Create applmgr user and assigning to dba group
# useradd -g dba -d /apps/oracle oracle

 Set ownerships
Create two directories product and oradata.
# mkdir /apps/product/
# mkdir /apps/oradata/
Change ownership of product to applmgr
# chown applmgr:dba /apps/product
Change ownership of oradata to oracle
# chown oracle:dba /apps/oradata

1.2 Set host name to Fully Qualified Domain Name ( FQDN ).

 Check whether we already have FQDN, to skip this step
# hostname
ex: apps11i.test.com ( we can leave this step )
[or ]
# hostname
ex:apps11i ( we need to convert it to FQDN as above )

 Follow these steps to make host name as FQDN
Need to update /etc/hosts file and save this file
# vi /etc/hosts
IP ..com Alias
ex: 200.200.2.170 apps11i.test.com apps11i
The updated value will get affected after rebooting the system, so reboot the system.
# reboot
Once the system is booted log in as root and check for FQDN
# hostname (This time it should show full name)
(Once the name is set we can move to next step, else try editing /etc/sysconfig/network and other possible ways). Until we set FQDN correctly we aren’t eligible for the next step.


1.3 Installing two Inter-operability patches with RPM Package Manager to make it compatible with RHEL 4.

s.no Name Action purpose
1 compat-oracle-rhel4-1.0-5.i386.rpm Provides gcc and g++ scripts that use libgcc.a 2.96 Provides compatibility for certain Oracle products running on RHEL 4
2 compat-libcwait-2.1-1.i386.rpm Installs /lib/libcwait.so to provide a missing symbol needed by some Oracle products

1.3.1 Install Inter-operability patch 1

Move to the Stage directory where the software’s are downloaded and copy the file.
# cp /Stage_11510/11.5.9/Stage11i/patches/compat-oracle-rhel4-1.0-5.i386.rpm /apps/softwares
 Move to the /apps/softwares directory where the file is copied.
# cd /apps/softwares
 Install compat-oracle.. with RPM Package Manager (rpm)
# rpm –ivh compat-oracle-rhel4-1.0-5.i386.rpm

1.3.2 Install Inter-operability patch 2

Move to the Stage directory where the software’s are downloaded and copy the file.
# cp /Stage_11510/11.5.9/Stage11i/patches/ compat-libcwait-2.1-1.i386.rpm /apps/softwares
 Move to the /apps/softwares directory where the file is copied.
# cd /apps/softwares
 Install compat-oracle.. with RPM Package Manager (rpm)
# rpm –ivh compat-libcwait-2.1-1.i386.rpm

1.4 Set environment variable in system profile ( /etc/bashrc )

Move to the etc directory
# cd /etc
Edit bashrc file, save and quit (These changes will be effected on all OS users)
# vi bashrc
Press Shift+g (This will take you to the last line of the file)
Add the following lines:
 LD_ASSUME_KERNEL=2.4.19;export LD_ASSUME_KERNEL
 unset LANG
Purpose: Since some modules still rely on older kernel version, this will make to load 2.4.19 kernel version. Present RHEL 4 kernel version is 2.6.9-5.


This completes Pre Installation steps. Now System is prepared for 11.5.10 installation.

2 Main Installation Steps

2.1 Change the directory to Stage directory where 11.5.10 dump is stored

# cd /Stage_11510/11.5.10/startCD/
# cd Disk1/rapidwiz/
# ./rapidwiz (This brings Java-Installation Screen)

Oracle Applications Rapid Install Wizard

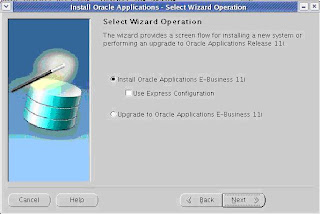
 Select “Install Oracle Applications” ( default )
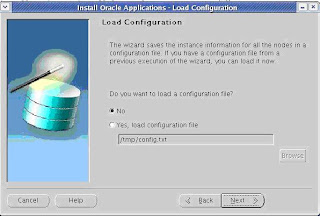
 Click Next to move to next screen


 Select No ( default )
 Click Next to move to next screen


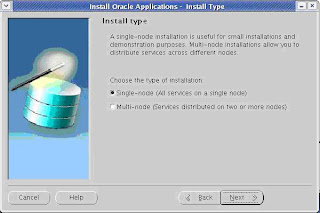
 Select “Single Node (All services on a single node)”(default)
 Click Next to move to next screen


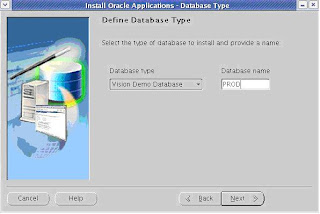
 Database Name: PROD
 Database Type: vision demo database (select from Drop down)
 Click Next to move to next screen


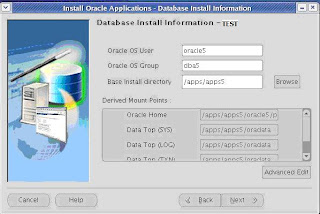
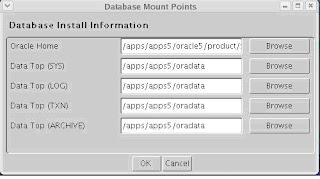
Database Install Information -

 Oracle OS User: oracle
 Oracle OS Group: dba
 Base Install directory: /apps/


Click “Advanced Edit” button of this window to edit internal directory structure.

 Oracle Home: /apps/oracle/product/920
 DATA_TOP(SYS): /apps/oradata
 DATA_TOP(LOG): /apps/oradata
 DATA_TOP(TXN): /apps/oradata
 DATA_TOP(ARCHIVE): /apps/oradata


Click OK

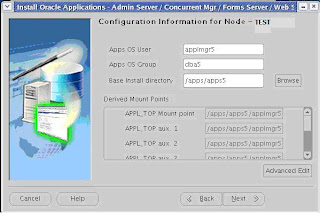
Configuration Information for Node -

 Apps OS User: applmgr
 Apps OS Group: dba
 Base Install directory: /apps/


Click “Advanced Edit” button of this window to edit internal directory structure.

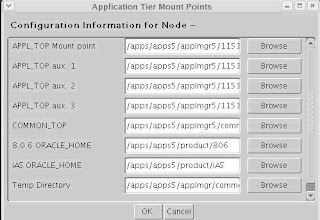
 APPL_TOP Mount point: /apps/applmgr/11510
 APPL_TOP aux. 1: apps/applmgr/11510
 APPL_TOP aux. 2: apps/applmgr/11510
 APPL_TOP aux. 3: / apps/applmgr/11510
 Apps OS Group: dba(default)
 COMMON_TOP: /apps/applmgr/common
 8.0.6 ORACLE_HOME: /apps/product/806
 IAS ORACLE_HOME: /apps/product/iAS
 Temp Directory: /apps/applmgr/common/temp


Click OK


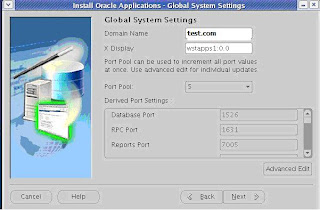
 Select ‘Port Pool’ value with no conflicts.
 You can check the port pool values by clicking Advanced Edit.
 Click Next to move to next screen.


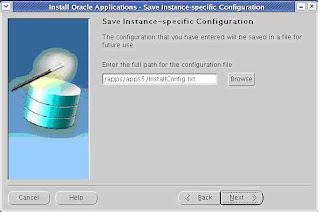
 Enter the full path for the configuration: /apps/InstallConfig.txt
 Click Next to move to next screen


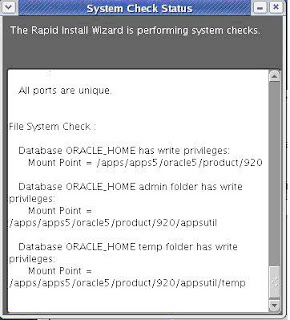
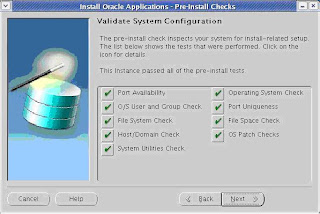
 This will take some time. It will check for the directory structure, File space, Port Availability, Users Group Check, Host Domain Check...
 After checking, this will exit by leaving a report in the next screen.


Concentrate more on the Crossed and Exclamation marks. Resolve the problem and start from Step 7 again until there are no issues.
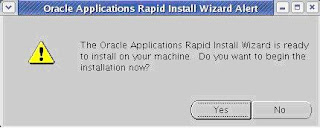
 Once every thing is fixed click Next to get to the final screen. Click yes to install.


This is the final screen. If you want to continue with the installation process press “Yes” and can quit the installation by clicking “No”.


Press “Yes” to start the Installation process. This takes few hours according to the system configuration on which the installation going on.

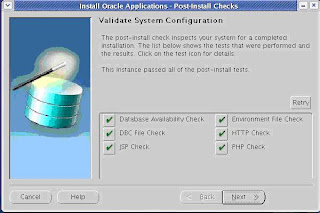
 This is the first Screen of the post installation process, this screen is a report for the health of the respective components.
 You can click the check marks to know more about them in detail.
 Click next to the final screen.


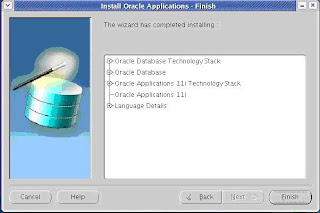
 Scr15:


Click “Finish” and this completes Main Installation process.

Note: - Post Installation Steps are conditional, they need to be performed when your OS is not compatible with the Apps Instance. Check the below mentioned steps whether they are required for your case.

 If your Apps Instance is 11.5.9 or below, you need to perform “Post Installation Steps”
 Since 11.5.10 is certified with RHEL4, we can omit “Post Installation Steps”.
 RHEL2.1 doesn’t require the “Post Installation Steps”.


3 Post Installation Steps:

3.1 Applying inter-operability patches

3.1.1 Install 8.0.6 Inter-operability patch

Login as applmgr user and set the environment
$ su - applmgr
$ cd 1159
$ . APPS.env

 Move to the Stage directory where the software’s are downloaded and copy the file.
$ cp /Stage_11510/11.5.9/Stage11i/patches/p3830807_8063_LINUX.zip /apps/softwares

 Move to the /apps/softwares directory where the file is copied.
$ cd /apps/softwares

 Unzip the patch.
$ unzip p3830807_8063_LINUX.zip

 Move to the patch directory
$ cd 3830807

 Set Execute permissions to the patch.sh
$ chmod u+x patch.sh

 Run the patch.sh script
$ ./patch.sh
$ cd $COMMON_TOP/admin/scripts//addisctl.sh start

 Relink the Executables
$ ./adrelink force=y “all”

This will relink all the executables to the oracle products.

3.1.2 Install Discoverer patch

Move to the Stage directory where the software’s are downloaded and copy the file.
$ cp /Stage_11510/11.5.9/Stage11i/patches/p3170128_4i_LINUX.zip /apps/softwares

 Move to the /apps/softwares directory where the file are copied.
$ cd /apps/softwares
$ unzip p3170128_4i_LINUX.zip –d 3170128
Move to the patch directory
$ cd 3170128

Stop all Discoverer Services
$ $COMMON_TOP/admin/scripts//addisctl.sh stop

Move to Oracle Home/ vbroker/bin and take a back up of following files
$ cd $ORACLE_HOME/vbroker/bin
$ cp osagent osagent.bak
$ cp locserv locserv.bak
$ cp osfind osfind.bak

Copy New files from the unzip directory to this directory
$ cp /apps/softwares/3170128/osagent .
$ cp /apps/softwares/3170128/locserv .
$ cp /apps/softwares/3170128/osfind .

Start all Discoverer Services
$ $COMMON_TOP/admin/scripts//addisctl.sh start

3.2 Bounce all the services

Stop all the services
$ cd $COMMON_TOP/admin/scripts//adstpall.sh apps/apps

Start all the services
$ cd $COMMON_TOP/admin/scripts//adstpall.sh apps/apps

This completes the Post installation steps. Now the instance is ready for use.

Patch Basics

All about Patches
In Oracle Applications patches are categorized as following.

Apps patches
Tech stack patches
Database patches


Apps patches can be applied by an utility called adpatch.

Tech stack patches belongs to the tech stack components of the Oracle Apps, which include Forms,reports,Discoverer,application server(9iAS in case of Apps 11i).

Database patches are used for fixing bug in the Database or adding an new feature which was not available prior. Database patches are applied through an utility called OPatch